This image was shot without the benefit of a robot, and in a path that required me to shoot from 2 directions and hope I got things close enough. Well I did, and after initially stitching the two sides independently and then joining those two panoramics I had a first draft. I rejected this first attempt as it was obvious to me that the projection settings on the 2 sides was not the same. I went back and re-stitched it all in a single pass and that is what you see on the page now. This was a fairly easy and fast stitch as it is such low resolution (150 Megapixels). Here are the original images


Blue Farm House #3 Stitching Journal
I shot 13 panoramics as the sun set over the smoke from a near-by forest fire. After an initial stitch of all 13 I selected the image seen, and processed the originals though an anti-haze filter and re-stitched them for print. The final pano was stitched several times to deal with some out-of-focus images, but it fell into place pretty quickly. I spent another week getting exposure transitions worked out in photoshop. This is my version of a "selfie" - stitched in from pictures taken at the end of the day - hope you enjoy it.
Blue Farm House #2 Stitching Journal
I shot over 8,000 frames for this pano, and I stitched 12 panoramics at full resolution for review. After review I selected the images from the third full panoramic of the morning, and processed them though an anti-haze filter and re-stitched them for print. The final pano was stitched only twice before the layers were produced, and I spent another week getting exposure transitions worked out. The sun-flair on the right side of the picture presented some challenges as a piece of dust on the lens showed up in a perfect matrix around the sun. Fortunately I was able to deal with this and leave only a couple of these artifacts in the final image. Overall a smooth post with few issues.
Blue Farm House #1 Stitching Journal
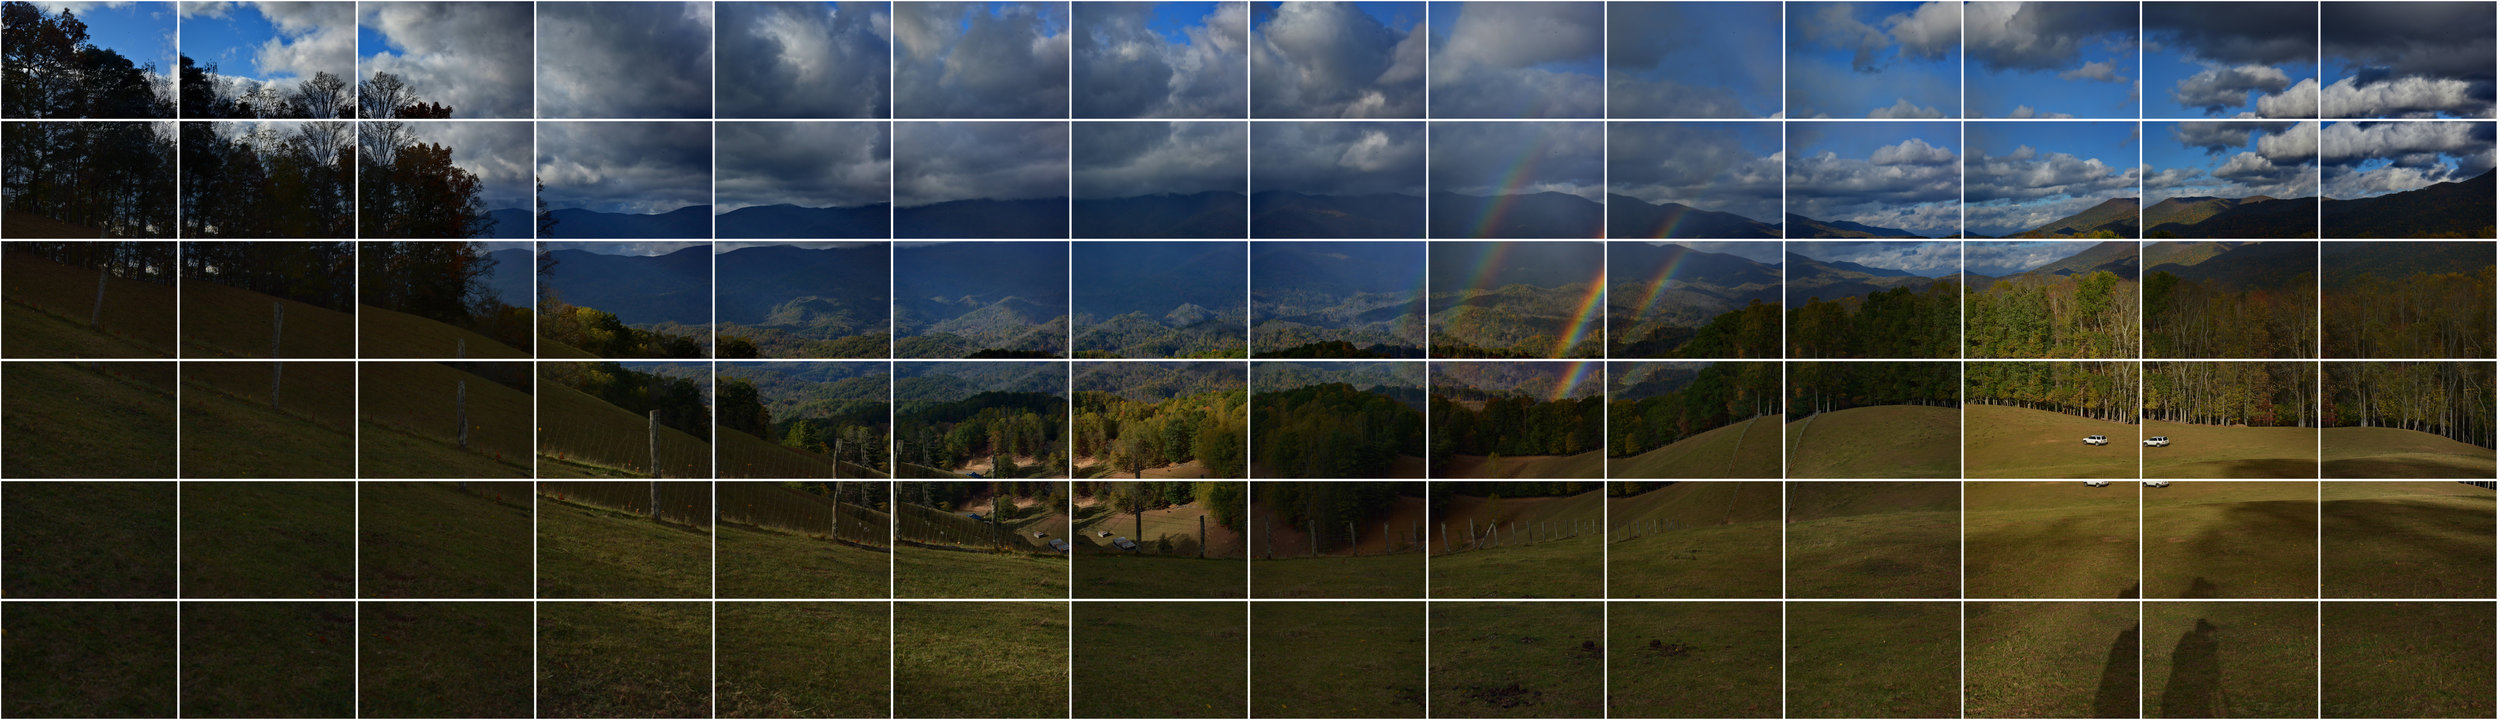
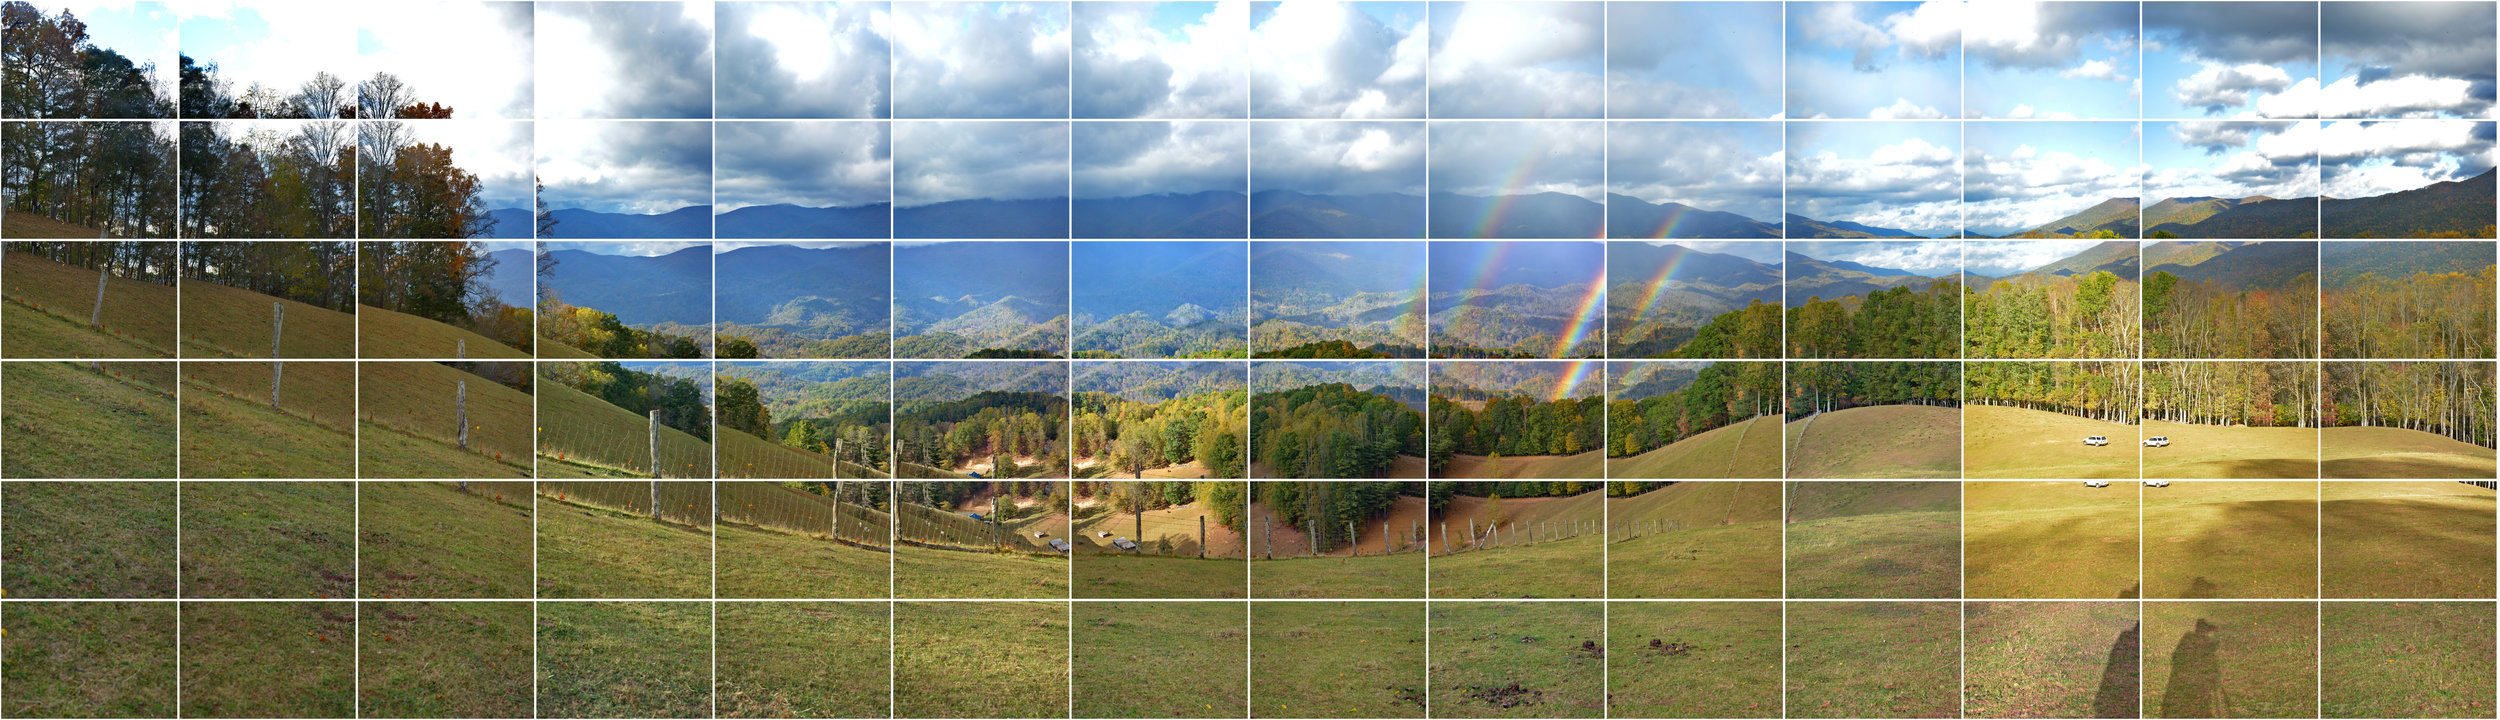
I shot over 5,000 frames at this location on Friday night, and I stitched 17 panoramics at full resolution for review. After review I selected the images from the first full panoramic of the evening, and processed them though an anti-haze filter and re-stitched them for print. This was the only set with the rainbow in it. If you review the 5 bracketed exposures below you will see some of the real challenges with lighting changes that can occur when shooting a very high resolution panoramic. You can see when the clouds moved and the rainbow disappeared and the severe lighting changes that followed. The final pano was stitched only four or five times before the layers were produced, and I spent another week getting exposure transitions worked out. After a review of the images below you may be able to spot some imperfections that persisted through the project. In the end it was one of those things where I just had to accept the imperfections as part of the beauty of the shot.


Valparaiso Stitching Journal
August - October 2012 Post Processing phase 1
This was one of my first attempts at using exposure bracketing, and on the bus back to Santiago, looking through the images on the camera, I knew I had something special. It would be two weeks before I was back in front of my computer and could begin the stitching process, which turned out to be the first of many delays in working on this print. Igor who had been so wonderful in helping me find the location, was very persistent in asking about when the picture would be ready. I believe he was probably as excited about what was to come as I was apprehensive.
Stitching
My computer at that time took over four hours to do initial control point identification, and a full stitch was running about ten hours. The majority of the picture was stitching just fine, but the stretch of horizon that did not have anything but those beautiful hues lacked any real edges for the stitching software to use as alignment points. The process became very protracted, and getting all the layers to line up properly proved a bit challenging. I eventually gave up on getting a perfect stitch and addressed the distorted horizon manually in photoshop.
Photoshop Post Processing
After spending a good bit of time manually matching individual pictures back into the panoramic to fix the "dip" in the horizon I started to work on the HDR process. While the stitching software offered some strong HDR processing, I never liked the way the final product looked. I started to experiment with using photoshop layer masks to bring out the layer I wanted to use in each part of the picture. This was a real learning process and took months before I felt like I had something that looked good.
Initial Publication
The first run of prints for this image were very popular, and sold in canvas prints ranging up to 10' wide. This first run was based on the raw images with no filter processing and the colors, while nice, were not quite as bold as I had remembered.
April 8, 2017
After 5 years of doing gigapixel panoramics I felt that I had significantly improved my skills in the stitching and post process, and fallen in love with a haze neutralizing filter that seemed to make the colors pop even in those long focal length shots. I went back into the archives and found all of the original images, and processed them through the new filter and embarked on completely recreating this image. The filtered images are shown below organized into the three exposure layers.


June 18, 2017
Now on my new computer, the initial control point detection took less than two hours, and a full stitch was complete in just over four hours. This allowed me to spend only a couple of weeks in the stitch portion of post, and after some frustration and about 15 full stitches I finally got a perfect stitch, with the horizon properly aligned and all the colors where I wanted. The photoshop post processing this time went much faster as my skills in the techniques had improved, and I was ready to print in just a couple of weeks. The final layers of exposure are shown below.


June 21, 2017
For this new print I wanted to really step up my printing game, so I started looking for a new Fine Art print service. What I found was French Broad Imaging and Josh Niven. The work he did printing, sealing and framing this image is AMAZING and we now have limited edition 5-year anniversary prints available. The color in this new image is mesmerizing and the printing brings the resolution to bear in a dramatic way.
July 21, 2017 - 5 years after the original shooting. Limited Edition 5-yr Anniversary Prints now available!
Oconaluftee Journal
Project Journal from shooting to post processing for the Oconaluftee with Kenya panoramic
Read Moreand now for some good news.....
Whew, after four months of backing up files, and working through tech support I have located and corrected the root cause of the problem by installing a recently published RAID driver update from LaCie. I recovered 100% of my pictures from the last 7 years. This means that I now have access to all 40,000+ photos shot in October and capacity to start working on new panoramics. Look for new works to start coming out later this month! As a preview here are a few of the Scouting shots from the Cherohala Skyway expeditions. There are 7 images to view (the numbered file names at the top of the image). These images are all less than 2 Gigapixels, but you can still zoom a good bit on most of them.
Disaster narrowly averted
For my family, friends and followers who have come to expect new work from me in November and December - this year's publication will be delayed until probably March or April. I have had a hard drive semi-failure and will not be able to resume stitching work until I've backed up roughly 6Tb of images so that I can address the failure and get my rig in a position to run stitch jobs.
So.... What happened, and why so long to recover? It's a little complicated. Running gigapixel stitch jobs, and editing the resulting large files requires a lot of space. Large scale stitch jobs require 600Gb of temporary file space - and the resulting files can be in the 25-50Gb range which means photoshop likes about 300-400Gb of temporary file space to edit them. I store the original photos as well as the stitched output on a 30Tb Raid-5 thunderbolt drive and work to keep 650Gb of the internal SSD drive free for temporary files. At some point in late October the thunderbolt cable was kinked and file indexes appear to have been courrupted. I am able to recover files and have started backing up to my Amazon Glacier storage, but that will take a while. Once I've gotten everything backed up I will be able to run full recovery (likely re-formatting) the 30Tb external drive and then I can get back to work.
I've already backed up all of the final panoramic works that I've printed to date, and the images that were shot in 2016 and 2015 (1.2Tb). I'm currently half way through 2014 (one of my most prolific years to date) and hope to be completed (back to 2008) by March. This has been a very discouraging time for me, the scare of loosing all the files and the long road back are challenging. The thing that keeps me going is the thought of stitching some of the works that were shot just days before the hard drive failure. My collaboration with Micah is at the top of my to-do list once I get this all sorted.
Blue Farm House Shooting Journal
Early October scouting
The month of October is my busiest month for taking pictures in the Appalachians. This year I decided to shoot the very south west portion of the state, and I made several trips back-and-forth to the Cherohala Skyway. On the Smoky Mountain Expressway just passed Waynesville in the Nantahala forest I caught a glimpse of a pasture on a ridge line as I was going around a curve in the highway. You could only see the vista for about 30 seconds on the expressway. The next time I came by and spotted the same pasture, I spent about two hours driving around in the countryside looking for that view. That day I abandon my search and continued on to Cherohala. Later in the week I again spotted it on my way down and spent another few hours looking for this elusive pasture to no avail. After a two day outing and some camping in Joyce Kilmer forest, I determined that I would find it and recruited a fellow photographer (Micah Mackenzie) to help me in my quest.
The next day Micah and I drove down, determined to find this location. When we first spotted the view from the highway we immediately pulled off and brought up our phones and map apps and looked at the satellite view to determine exactly where the pasture was. Then we switched over to map view to try and find a way to drive up. The problem was none of the map applications had roads that went anywhere near the pasture. We drove around for several hours without any luck, driving through the same rural neighborhoods over and over.
Driving through these neighborhoods taught me something about white privilege.
I normally would not feel the need to mention that Micah is black, however during the course of this project I learned a new level of respect for exactly what white privilege means, and I can't relate that without mentioning Micah's race. You should also be aware of where this shoot is located, in a very rural part of Jackson county, where as recently as the 1970's black people were not welcome. Visiting high school football teams would field a smaller team because the black players could not travel to Sylva. This was at the same time I was attending high-school, so when I heard this story the timing resonated with me. We had no sooner pulled off the highway before I noticed a truck in a driveway with a confederate flag waiving from the antenna. A few more miles down the road and I saw a confederate flag flying with the US flag in someone's front yard. This was the first time I had driven around in the country and seen those symbols as potentially threatening to my passenger. I was uncomfortable with it, and still absorbing the new insights when Micah asked me how to spell "trepidation".... from this point forward in the story, ask yourself "could a black man have pulled this shoot off without a white chaperon?" Finding this location, and gaining access to shoot was an exercise in white privilege. Now back to finding the view:
After driving around for several hours, exasperated and ready to give up again, I pulled into a driveway and knocked on the door. A very nice gentleman and his dog came out, with a rather puzzled look on his face. I asked if he knew were a blue roof farm house was and he looked at me oddly, glancing out to Micah in the car and back at me with my long hair and sandals. I could tell he was uncomfortable, a hippie shows up at his door with a black man in the car asking about finding a house. I told him we were photographers and looking to take some pictures from the pasture. I explained that I could see the blue tin roof from Apple maps and showed him on my phone. A big grin came over his face and he told me "yeah I know where that is, you just go down the road here, and when it turns into a dirt road turn left at the third mailbox and just keep going back that driveway. You'll pass about four other houses before you get there but it's up that way" and after a short drive we found the blue tin roof farmhouse. I found out later that this man was related to the folks who owned the house, and they were aware of our escapades before they got a call from me. This contact was the key to the shoot, and it was based in white privilege not because the people I spoke with would not have helped Micah, but because he would not have felt comfortable enough in this neighborhood to even try. After all, if I had made a mistake and gone to a house where Micah was not welcome, they would have turned me away without harm, and Micah has no such guarantee in today's America.
No one was home at the blue tin roof farm house and there was no name on the mailbox but there was a street address. The farm was a beautiful piece of land, and they had quite a few of the most beautiful mule's I've ever seen as well as horses, goats and several large dogs. We couldn't get to the top of the pasture without going through fences, but we could see it from the house and we're very excited. I left several business cards (in the mailbox, under a windshield wiper, and at the door). As we drove back to Asheville I started thinking how I could get access to shoot from the property. Once home I did a quick google search on the address from the mailbox and sure enough an article about a cemetery on the property came up, and as luck would have it the care takers were listed as Mr. and Mrs. Hoyle and there was actually a phone number. I called and left a polite message explaining that I wanted to shoot there and she called back the very same day, and said they love to share their view with folks. I was so excited I could hardly stand it, and it would be another full week before the colors we're at peak.
Blue Farm 1
I wanted to share this location with another friend of mine (Mike Rice from Mike Rice photography) so I arranged a time, and he and I drove up on a Friday afternoon. The skies were partly cloudy and I was thinking we might have a nice sunset, and I was anxious to meet the Hoyle's. Upon arriving we found this wonderful couple that were more than happy to share their view with us. She took one look at his car and said "I don't think that'll make it around the backside, let me drive y'all up there." We piled all of our equipment into her SUV and she drove us around the backside of the pasture through the woods. We stopped at the first opening and she said "we call this view halfway to heaven". The view was amazing, but we didn't linger long and she drove the rest of the way through another stretch of beautiful woods, up the hill to the view you'll see in the Blue Farm 1 print. It was probably 40° and it was misting and at the top of the hill. The wind was blowing at about 30 miles an hour. In other words, it was freezing. While I was setting up my shot, a beautiful double rainbow appeared but before I could get through capturing the entire image it disappeared as quickly as it had come. Mike Rice managed to capture a beautiful complete picture of the double rainbow and you can see it here.
After we came back down the hill, we spent some time chatting with the Hoyle's and I must say they were some of the nicest and most entertaining folks I've meet in a long time. Mr. Hoyle was a miller by profession, which meant that not only did he know how to turn trees into lumber but was a mechanical engineer. He was more than happy to share his collection of antique gadgets with us. I remember in particular a millers tachometer that was used to test the spin rate of a blade in the mill. With each new piece he would explain what it was and how it was used. We spent some time looking at tack - he has a huge tack barn with full show gear for an 8-mule team. He showed us a few bar-room tricks (how to balance 16 nails on 1 nail). We shared laughs and stories for over an hour, and at the end of our visit we arranged to come back early in the morning and catch sunrise from the pasture.
Blue Farm 2
Having made arrangements to shoot early in the morning Mike Rice and I got up and out before dawn. We drove all the way out to the farm house and were greeted by the smell of bacon and eggs and an invitation to have breakfast. We explained that we were in a hurry to catch the sunrise, and that we had brought hot chocolate and a camp stove so we would be fine. Once again we packed all of our equipment into Mrs. Hoyle's car and she drove us to the top of the hill. This time it was much too cold for her to stay, and Mike and I had difficulty even getting a camp stove started because the wind was so strong. I stayed in the wind long enough to catch seven panoramics. I ended up printing the one shown in Blue Farm 2.
After finishing the shoot, and walking back down the hill, we again sat and enjoyed the company of our hosts who were as polite and entertaining as the evening before. At one point Mr. Hoyle needed to make some room to show us another trick, and I watched in awe as this man picked up a 50lb Anvil with one hand and moved it out of his way. Now Mr. Hoyle is not a small man, but he's not a young man either, and I could barely pick up the anvil with two hands, much less grab it by the horn and carry it around like he did.
Blue Farm 3
The next day, Micah Mackenzie and I spent most of the morning shooting at the Oconaluftee river near Cherokee, and we wanted to catch a sunset from the Blue Farm house one last time. We made it out in the afternoon and Mr. and Mrs. Hoyle were just as polite and welcoming as ever. This time we had a car that would go up the road, so we went up the hill ourselves and spent the majority of the evening shooting. I shot 12 panoramics and we got several lovely shots with our model. When we headed back down the hill to say goodbye the extended Hoyle family was there and we spoke for a moment, but the conversation was a little awkward so we said our goodbyes. As we were leaving we drove by the tack room and Micah said "wow look at that" so I stopped immediately and backed up because I knew Mr. Hoyle would be super happy to show Micah the tack and some of his toys. We got out and all went into the tack room and started looking around. Micah was very impressed and then he spotted a bull whip and asked if he could see it. Mr. Hoyle smiled and said, "Yeah, let me get my boy out here to show you how it's really done." After a few minutes one of his sons came over and demonstrated that the bullwhip can sound louder than a rifle and a man can make a bullwhip crack like that six or seven times in a row. Mr. Hoyle told us a story of a mule team owner that had requested a 21 bullwhip salute at his funeral. After an hour of chatting and sharing stories, we said our good byes and drove home with smiles all around. It was one of my favorite shooting days ever, and Micah commented on how nice they were and what a fun day it had been.
Over the course of these three days, I shot over 10,000 frames at this location. Of the 35 panoramics that were taken, the three described above and a quick "in-the-woods" experiment were printed.

Can Collaborative Art Projects set Asheville apart from the crowd?
I am still very new on the Art Scene, so much so that I still classify my work as a hobby. My day job has sent me all over the US and I always enjoy checking out the local art scene. Based on what I've seen, I believe that Asheville has a world class art community, with a few stand-out talents. Perhaps it's because of all the natural beauty in the region, or maybe it's the open and welcoming social environment, or the fact that good art inspires more art. Whatever the reason, I find myself wondering what could the Asheville art community do to stand out and shine even brighter. This line of thinking lead me to consider that collaboration within a community can lead to far greater things than any collection of individual accomplishments, and so I started to promote the idea of collaborative art projects.
My first such collaboration has been months in the making so far, and we have yet to shoot a single frame together, but I'm more excited about this project than I have been about anything I've ever done. The whole process started with finding another artist whose work I admired, and who found my work at least interesting. Micah Mackenzie was defiantly that artist for me. His work has inspired me from my earliest experiments with photography in Asheville, and he has always encouraged me in my efforts to improve. When my son sent me some examples of landscapes double-exposed with models I knew that I wanted to create some of these prints using my own landscape backgrounds and Micah's beautiful portraiture work. I approached him with the idea and he showed enough interest that I started to see his work super-imposed on the landscapes I was looking at everywhere I went. In the time since that first discussion we have gone out on one scouting expedition, and we are in the process of scheduling shoots.
Look for some exciting new prints, just in time for Christmas - and follow me on Facebook for updates on the project.
Bob the computer gets a new home.
Like most nerds, I'm kinda proud of my tech.... and I have a great appreciation for art and presentation and the inspiration a beautiful workplace can bring to my work. This is the rig I use to stitch my pictures, in it's new home. The table is a beautiful custom piece from Zach Noble, at Noble Forge, with Woodwork by Chris Spoerer from Union Woodworks.
The artisan's work:
Facebook Marketing Study
Looking back at web traffic for the last two months, is Facebook marketing worth the effort?
Read MoreProject Journal: Dali Museum Stitch (Surrender)
After a full day of working on this shot, five more stitches and at least 8 hours of control point and ghost removal I have succumbed to the fact that I made too many mistakes when shooting this image. I will publish a final crop of what made it, but this will likely never make it to print and I doubt I upload a full size version. Chalk this one up to a learning experience.
Project Journal: Dali Museum Stitch (cont.)
After initial reviews I have discarded all but two brackets of this piece, so I'm now stitching only 126 images. Removing those layers did mean I had to re-work a lot of control point links. I've also had to spend a lot of time trying to hide HDR ghosts. All in all about 4 hours of work, and just over 100 CPU hours of stitching (three more stitches). I've found several flaws that may not be fixable, and I'm still trying to hide ghosts. I've learned a good bit about trying to shoot in high traffic areas, and discovered the hard way that parallax is much more important indoors. While some crop's may be cool, and I'll likely still upload something, I'm not going to promote this one too much. I think I need some more practice on indoor work before I offer commercial real estate services, maybe the Basilica ?
Project Journal: Dali Museum Stitch
Having narrowed the stitch down to 335 images, it took a bit to find the extra four frames (20 images) that were duplicates. The initial control point recognition showed me just how much work this would take, and after about an hour of control point tuning I ran the first stitch. I knew this wasn't going to yield a good product, but wanted to see where the focus needed to be. The new box made short work of this job, rendering in less than an hour. Over the course of the evening I spent about 3 more hours in control point tuning and ghost removal and ran three more stitches. Late in the evening I flattened a rendered image and loaded into a pano tour to explore. This is going to be a cool picture, here's a teaser:

Stitch Journal - Aston Park
I didn't do a great job of keeping track, but here is a rough journal of the Aston Park panoramic. I've been wanting to shoot from the Aston Park apartment building for several years now, and was determined to make it happen this fall. All in all I think I've got around 80 person hours and over 500 CPU hours of time in this project and as of this writing I have not taken anything to print yet.
October 3, 2014
After several attempts to get in touch with the correct people I received a call back from the secretary for the CEO of the Asheville Housing authority, who put me in touch with the building manager. She was very nice and put me in contact with the building maintenance staff and after a few phone calls we agreed that I would watch the weather and get in touch with them sometime during the next couple of weeks.
October 13, 2014
After a week of shooting at higher elevations the colors were finally starting to get into the valley, so when the weather came up perfect I made the call. It was a beautiful blue sky broken up by frequent clouds with shadow's passing across the mountains, giving glimpses of Mission Hospital and Downtown highlighted by beautiful fall color, and the sun was dropping a cascade of shadows across the layers of blue ridge mountains to the west. I was pleasantly surprised by a call from my friend Susan, and asked her on a fluke if she wanted to go on an adventure. She was up for whatever, and after some quick staging we headed over to South French Broad. After a brief wait to meet the building manager we took the elevator up to the top floor of the building where the maintenance man was even kind enough to provide me with a ladder to get to the top of the roof over the staircase. With a nearly un-obstructed 360° view. I shot seven panoramic's there, two fully immersive at minimum resolution, followed by five at max resolution. I was shooting 5 exposure brackets, and the max-res shots were 5 rows by 30 columns. It get's kind of boring watching me shoot pictures, so Susan ran back to her place and brought a bottle of wine and some snacks back, and we enjoyed a roof top picnic and watched the sun drop down behind the mountains hoping for a sunset that never came.
October 14, 2014
I follow a fairly standard practice when downloading pictures. Once they are downloaded to my primary hard drive, they are copied to the backup drive before being removed from the original SD/CF cards. Once they are downloaded I use the Mac Finder app to preview the pictures and catalog where each pano begins and ends and do a primary review for missing or duplicate frames. The initial review looks very promising, but does reveal that one of the full resolution shots is missing a frame. I must have missed a frame when I had to make a battery change half way through a shot. Once I've identified all the pictures in a panoramic I will tag them for off-line archival and post processing. Cataloging, tagging and reviewing 4,600 pictures takes about three hours, and then I record it all in a workbook (I am after all a geek).
November 2, 2014
After a break to work on a few more pressing pictures I was glad to get back to the Aston park project. Now that the pictures were all tagged, it's fairly easy to use AutoPano to import the pictures for a single pano and launch control point detection. During the import you identify the order the pictures were shot in, and the number of rows/columns/brackets, and give it some instructions on how control point detection should deal with the layers. Then just click "Finish" and thirty minutes to an hour later you have your first glimpse of what the final product will look like. These pictures were detecting very well, with only a few "orphan" pictures or sub-panorama's to resolve. After an hour or so of reviewing, correcting and adding control points it's almost ready to be rendered. A quick check to see which will be the best projection (I typically use either a spherical or cylindrical projection), and a final adjustment to make sure the horizon is level and I'm ready for the HDR color settings. I usually don't like the results of the HDR output, but the HDR settings allow me to deal with vignette issues in the sky portion of the image so I usually sped about thirty minutes configuring and saving HDR settings. The process was going very smoothly for this set, and I had the first three pano's ready for stitching in just over five hours. Kick of the big job and headed to bed with high hopes of seeing amazing outcomes in the morning.
November 3, 2014
All three pictures come out looking great, with a few minor flaws here and there. I'm not going to spend a lot of time doing exposure fusion of these images, so I do some very quick-and-dirty gradient based masks and flatten the images for use in PanoTour. Once the flattened image's are loaded into pano tour I generate the first interactive web page and start reviews. The first two pano's shot at relatively lower resolution come out very nice, and I decide to use Pano #2 for an immersive. Pano #3 was my first look at the high-res version and I was very excited to stitch and review the remaining four.
November 8, 2014
Another week gone, and I get back to the picture in ernest. After a late start, control point detection for Pano #4 and #5 go well and I kick off the stitch to run over night, feeling good about this one.
November 9, 2014
I awake to find that the stitch job has blown up because I didn't have enough free space on the target disk. After some housekeeping to make room, I decide to go ahead and stack up Pano #6 and #7 for a real big job. Control point detection goes very smoothly and I'm able to kick off the job before 10:00 AM. Eleven hours later the last job finishes sticking, and I now have almost 600 Gigabytes of photoshops to review.
November 10, 2014
These files are huge, but simply opening them and saving them in Photoshop reduces their size boy 30-40%. Unfortunately, it takes about 30 minutes to open each of these files, another 20 minutes to save the layers version, then pick a single layer and flatten it for use with PanoTour. By the end of the day I have a pano tour with all 5 gigapixel images. I open the tour in five tabs of my browser and spend several hours comparing each, evaluating composition lighting and double checking for stitching flaws. I spent some time reviewing them, and was satisfied that I should let them sit till next weekend.
November 15, 2014
After a lot of looking back and forth, panning and zooming, looking at lighting and color I decide that I'll use bracket 2 from Pano #4, brackets 0 and 2 from Pano #5 and brackets 1 and 3 from Pano #6. Shuffling the deck of pictures to get these images, with file names that make the easier to work with is made easier with a little cheat in Excel. I simply select the files in finder, copy and paste the filenames into the worksheet and it gives me a series of rename commands that gives me pictures with Pano#, Column#, Row# and Bracket# in the form P##C##R##B##.oldname.jpg. Open a terminal window and paste the commands and now I can use Finder search strings to find the pictures I want. A search for "(P04 AND B02) OR (P05 AND (B02 OR B04)) OR (P06 AND (B01 OR B03))" give me the files I want. Copy and paste the file names back into my workbook and I end up with P0XC##R##B## files for stitching.
November 16, 2014
After the doing the rename hokey pokey I import the files into PanoTour and Control point detection freaks out. It appears that using two bracket #2's has confused the algorythms. Off to the web to find a tool that I can use to edit the exposure exif data to avoid this confusion.
November 17, 2014
After some searching I find exif editor in the Mac app store and after reading a few paragraphs of documentation I've managed to change the exposure of Pano #4 bracket 2. It still takes a several hours to get control points all laid out and HDR adjustments lined up. At this time I'm expecting my new computer to be delivered any day, so I put the stitch aside to prepare for the move.
Novenber 20, 2014
Now that I'm on the new computer, I'm able to make one last pass at control point and color tuning and stitch Pano #X in just five hours. The picture I get is amazing, and there do not appear to be any stitching flaws. Work on fusing the exposure layers proves difficult however. Significant haze exists in the pictures facing west, making transitions between exposure layers painfully obvious. I haven't used it much before, but I decide to use the Neturalhazer filter. This is a pre-process plugin that has to be run on the images prior to control point detection. In addition to having to go back 2 steps, the haze filter is a single threaded process, so it can take a while.
November 21, 2014
I decided that the Pano #4 layer is too dark to use (after all the exif stuff) so I only run the dehaze filter (on Pano #5 at 80, and Pano #6 at 70). After almost three hours of pre-processing I launch control point detection and it fails miserably yielding an awful spaghetti mess. Three more attempts and nothing is improving. Now desperate to get this picture to completion I decide to discard the dehazed images and go back and re-apply the filter to all 5 layers at 60. Now control point detection is almost perfect, with 0 orphan images and only 1 sub-panorama to resolve. Color editing goes much faster, and I'm able to render the picture and take a quick look before bed.
November 22, 2014
This is going to be the final stitch, and after about three hours of setting up layer masks to expose the correct pictures I flatten the image, load it into PanoTour and render a page for review. Everything looks great, however there are a lot of blemishes from dust on the camera lens. These will likely not be obvious to anyone unless they zoom in considerably, but they bug me. I spend the next two hours with the brush healing tool fixing these minor blemishes and flatten the image one last time. Now I take some time and cut a dozen crop's for use as Facebook cover pages, and post thumbnails. Now import the picture into PanoTour and tweak all the settings for the final generation. Once I've got a good page, I make one final set of changes to the generated HTML to insert tags that Facebook uses when sharing a page. Now off to my web site to create the page to host the pano, upload 15,000 files to Amazon Web Services, test that the uploaded files look right, finalize the ssgpp.com page and activate it. Now I test that the page shares correctly using the Facebook Link debugger. Once everything's ready, it's time for the promote fest to begin. First I post the link to the SSGPP Facebook page, then to Visit Asheville, Downtown Asheville, Blue Ridge and several other popular Facebook communities. Then I share and like my own post, hoping to generate some buzz, cross my fingers and hope to get enough shares to send the image viral..... Next week I'll get a proof ready for print, and build the inventory of printable photoshop images.
Project Journal: Dali Museum Review
After returning home, I thought I had lost a SD card with a few thousand pictures on it, but while cleaning up camera bags for another shoot I found the card and finally got the images downloaded. There were several mis-starts, but I did get a full pano, and the shots look interesting. I haven't done many indoor pano's (this will be my first published indoor work). At this point I realize that it may have been a bit ambitious for my initial attempt, with the broad sweeping curves, high foot traffic, and vast spaces of blank "white space" this was going to be a challenging piece.
Gigapixel Challenges: Vignetting part 3
So, now it's time to resort to extreme measures to see if we can save this picture, or at least some crops from it. If you haven't read the background, look at the posts here. The stitching software (AutoPano Giga) has a plug-in tool that allows you to apply an Adobe Lens Correction profile to all of the pictures before stitching. You need a lens profile, and I found the profile downloader here. Vignette correction is tricky, as it will vary depending on the camera, lens, aperture, focal length and even image format. Adobe hosts a community where members can upload lens correction profiles and there are a lot of good ones out there, but finding the one that matches your particular shoot is hit or miss. I'm using a filter for the D700, with my lens and focal length, with reasonable success. So it's a simple 6 step process: pair down the panorama down to 3 layers, pre-process all 255 images, then control point detection, adjust the HDR merge parameters, render the pano and finally about 4 hours of post in photoshop. The end result, I don't think this will ever make it to print in wide format, but there may be 1 or 2 mediocre crop's in there. You'll notice that I have chosen to publish in a spherical projection that is limited to the image height, this minimizes the impact of the remaining artifacts. I think it's to the point that most people will tell me "no one would notice those" out of politeness when I point out the vignette artifacts.
So far the biggest lesson I've learned is that it's best to avoid vignetting from the get go. I think I need to spend some time understanding the impact that my camera, it's vignette correction, lens, aperture, ISO, focal length and image format have on the it. When I get some free time, on a blue-sky day I think I'll go shoot a series of 9 x 9 tests at various settings and see what it yields.
Gigapixel Challenges: Vignetting part 2
As you saw in the previous post vignetting in the individual frames and layers can be very obvious. Since the photo was shot at different exposures, I can use the HDR merge features of the stitching tool Autopano. After making some adjustments to the configurations to prioritize reduction in vignetting and a 2nd stitch yielded this pano. The vignette artifacts are still evident on the left side of the picture, and throughout the sky, but the majority of the foreground from the center to the right side is now clean enough to pass. At this point I will resort to a pre-processing filter that makes a lens and camera specific adjustment to all the pictures prior to stitching, unfortunately this process is not multi-threaded, so it will likely run in the background for at least 24 hours before I can do another stitch.
Gigapixel Challenges: Vignetting
Vignetting is why gigapixel photographers take sunny days off, blue skies make bad pictures because of vignetting. That subtile darkening around the edges of a picture is rarely a problem with single shot pictures, and sometimes it's considered a desirable effect. But when you're stitching pictures together, that subtle darkening can become not so subtle. I have become the master of shooting when the conditions are favorable to avoid the problem, but sometimes you can't wait around for the perfect weather. When the problem does pop up it can be ugly, with 9 out of 10 shot's never reaching print. I have had varying degrees of success with different approaches to correcting the problem and I'm still learning. Recently, I took a beach sunset pano, on a nearly completely cloud free evening and the subtle changes in lighting and hue over the 13 minutes it took to take the picture have combined with what was probably a poor choice in ISO or aperture to make the vignette artifacts worse than usual. I thought I would take this opportunity to share what I've learned so far, and see what happens when I do everything I can to save a picture. Hopefully if you follow this series of blog posts you will gain some additional insight to the challenges of creating these pieces. If you're a fellow gigapixel artist, please feel free to share and comment on lessons you've learned.
Step1: Shoot Bracketed Exposures
The most effective way to deal with the lighting changes you see across a picture is to shoot exposure brackets. All of these pictures were shot on ISO640, at F13, and exposure was bracketed at 1/1,250, 1/640, 1/320, 1/168 1/80. After initial review, I discarded the 1/1,250 and 1/640 exposures as to dark. Here are the other 3 brackets as individual layers. The vignette artifacts reach right out and slap you in the face on these. In my next post I'll show what the Kolor Autopano Giga software can do with HDR options and these layers.